HOW TO PUT IPHONE INTO DFU MODE

First Step to upload custom firmware on iPhone.

IPHONE TETHERING ON VODAFONE INDIA !

Get Vodafone India iPhone Mobile Settings here.

JAILBREAK IPHONE ON IOS7

Steps on how to Jailbreak iPhone on Firmware v7

DOWNGRADE BASEBAND

Downgrade for iPhone 3GS/3G

CONFIGURE GMAIL ON IPHONE

Now its easy to setup gmail account.

Showing posts with label Redsn0w. Show all posts

02 January 2013

How to upgrade a previously jailbroken iPhone to iOS 6 and preserve the baseband.

Steps to upgrade iPhone 3GS/3G to Firmware IOS6.

Step 1: Upgrade your Itunes to latest.
Step 2: Backup your iPhone to Itunes.
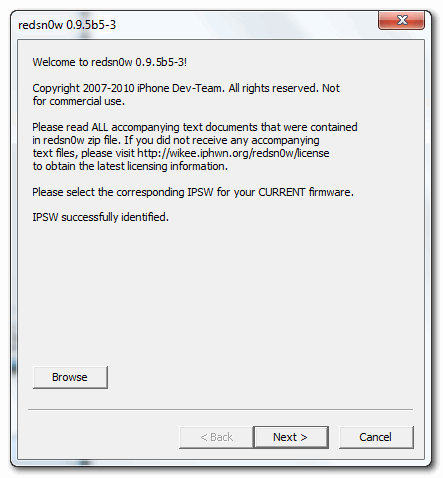
Step 3: Download the latest Redsn0w version i.e.  Mac OSX   or  Windows
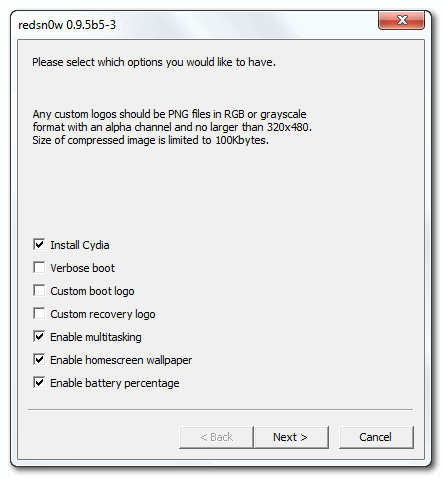
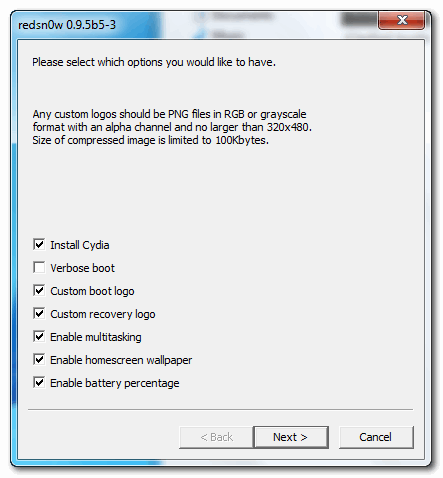
Step 4: Run your Redsn0w latest version and click on option [ Extras ].
Step 5: Your iPhone should be at firmware version 5.1.1.
Step 6: Select [ Even More ] and then [ Restore ]
Step 7: After that select [ IPSW ] i.e. firmware version 6.0.1 (which needs to be downloaded in advance).
Step 8: Select [ Yes ] to Preserve Baseband update.
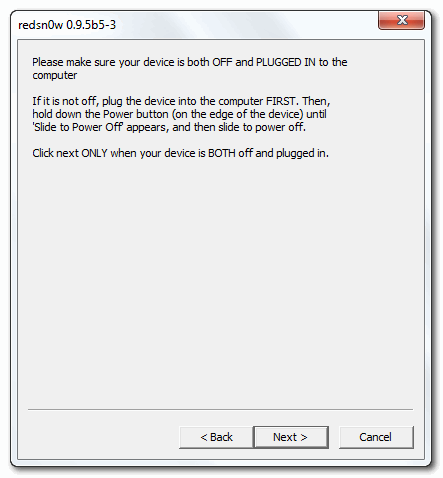
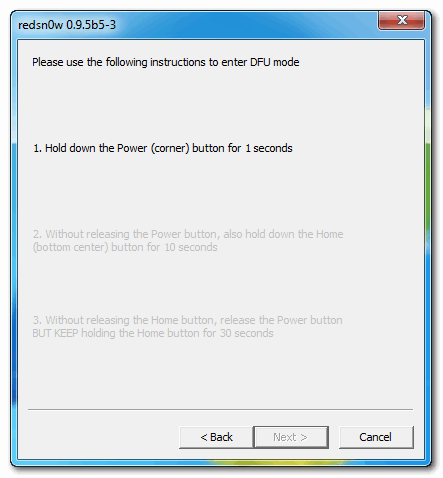
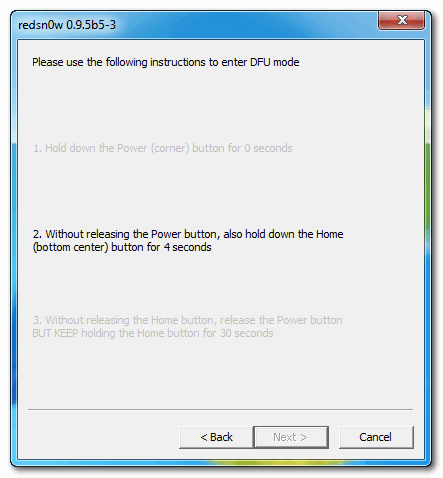
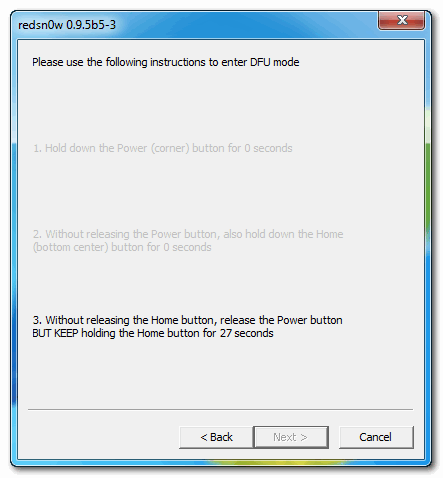
Step 9: Now get the device connected to DFU mode.
Step 10: With the iPhone connected and switched off, when you click on next you go through DFU mode.
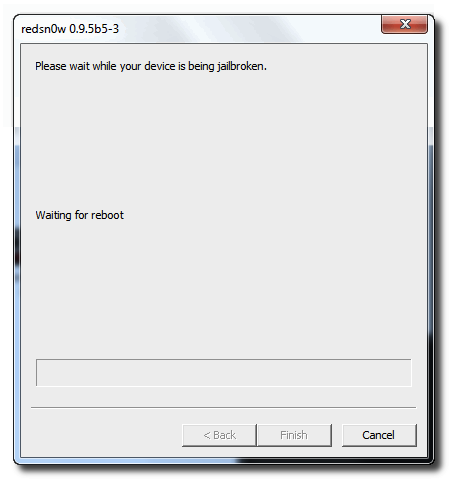
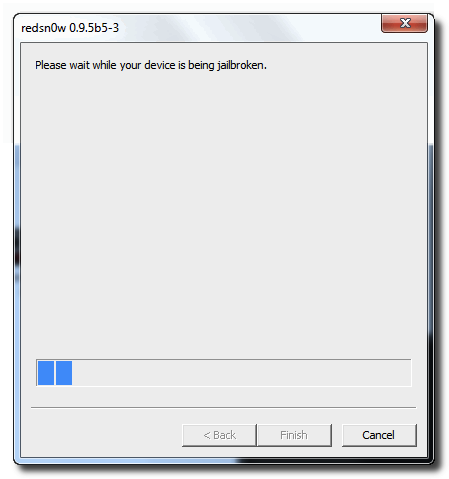
Step 11: Redsn0w will prepare a  restore image and restore it to the iPhone while preserving the basebands.
Step 12: At last the iPhone gets restore to Firmware version 6.0.1 with baseband version 5.13.00
Step 13: After this you just need to Jailbreak your iPhone and unlock it if required.

Thats it you are all set !


21 February 2011

Upgrade iPhone 3GS & 3G to Firmware 4.2.1 with Old Baseband <= 5.13.04


By New Boot i mean to say any iPhone 3G or 3GS bought recently ...
Download the Tools Needed :-
1 . Custom firmware for iphone 3Gs / 3G  4.2.1
Download custom firmware iPhone 3Gs
Download custom firmware iPhone 3G
2. Download Redsn0w 0.9.6b
3. Download Apple original firmware
Download original firmware iPhone 3Gs
Download original firmware iPhone 3G
STEPS TO UPGRADE IPHONE 3GS TO FIRMWARE 4.2.1 WITH BASEBAND 5.13.04 OR LESS..

1. Connect your phone with PC and switch off
2. Open redsn0w and choose Original firmware.
3. If you have newboot just press “YES”. If not then please press "NO".
4. now click “Next”
5. Choose “Just Enter pwned DFU mode right now”
6- now click “Next” again “Next” and follow the screen.
7. Put the Phone in DFU Mode.
After that open itunes and press “Shift + Restore” and choose custom firmware 4.2.1
it will finish very quickly
Once you update you firmware
1. Connect your phone with PC and switch off
2. Open redsnow and choose Original firmware
3. If you have newboot just press “YES”. If not then please press "NO".
4. now click “Next”
5. Choose Only “Install Cydia”
6. now click “Next” again “Next” and follow the screen.
7. Put the Phone in DFU Mode and after that it will do the needfull jailbreaking. Your Screen will Flash"white" once.
Thats it you are Done !!!
If you r getting White Cydia Icon just switch of your phone and open redsnow choose firmware 4.2.1 and choose the option “Just boot tethered right now” and click “next” again “next” then follow the screen then you will see the cydia.
Finally you can see your phones is with your old Baseband. now just you can install the ultrasn0w v1.2 from Cydia to unlock your iPhone with older Bootrom.
hea

23 January 2011

Restore & Update iPhone 3Gs To 4.2.1 On 6.15.00 Baseband

Restore A Bricked 3GS New Or Old Bootrom And Can Also Update Your Working 4.1 iPhone 3Gs To 4.2.1 On 6.15.00 Baseband

IF Your iPhone Is Not On 6.15.00 Baseband OR Has Not Crashed While Installing It Then these steps are NOT For You!


Things you need to proceed:-


1>iPhone 3GS 4.2.1 Custom Firmware.
2>iPhone 3GS 4.2.1 Original Firmware.
3>Redsn0w 0.9.6.b6.


Steps you need follow:-


1. If Updating Or Restoring To 4.2.1 Open Redsn0w And Select The Official Firmware, Then Deselect ALL Options And Only Check "Just Enter Pwned DFU Mode Right Now"

2. Once Finished, Open iTunes And Hold Shift Or Option On Mac And Left Click Restore In iTunes, Then Select The 4.2.1 Custom Restore File For 3Gs ( Depending On Your Device)

3. After Restore iPhone 3Gs Is Locked You Must Jailbreak So Watch This To Jailbreak And Hacktivate So Open Redsn0w Again And Select Official 4.2.1 FW Then Only Select The "Cydia" Option. After Reboot NEW BOOTROM 3Gs Devices Will NOT Boot So Watch This And Select The 4.2.1 Firmware In Redsn0w:http://www.youtube.com/watch?v=hhU1zU...

4. Open Cydia And Install Ultrasn0w To Unlock! That's It !


PLEASE Subscribe And Rate :)

Restore & Update iPhone 3G To 4.2.1 On 6.15.00 Baseband

Follow the steps mentioned below.


Things you need to proceed:-


1> iPhone 3G 4.2.1 Original Firmware
2> iPhone 3G 4.2.1 Custom Firmware
3> Redsn0w 0.9.6.b6

This steps are only valid  when you wanna Restore A Bricked 3G new or Old Bootrom And Can Also Update Your Working 4.1 iPhone 3G To 4.2.1 On 6.15.00 Baseband.


IF Your iPhone Is Not On 6.15.00 Baseband OR Has Not Crashed While Installing It Then theses steps are not valid.


Steps :-


1. If Updating Or Restoring To 4.2.1 Open Redsn0w And Select The Official Firmware, Then Deselect ALL Options And Only Check "Just Enter Pwned DFU Mode Right Now"

2. Once Finished, Open iTunes And Hold Shift Or Option On Mac And Left Click Restore In iTunes, Then Select The 4.2.1 Custom Restore File For 3G ( Depending On Your Device)

3. Open Cydia And Install Ultrasn0w To Unlock! That's It you are done.... 


PLEASE Subscribe And Rate :)


03 August 2010

Download all the Versions of Redsn0w

i have provided you all the links to download versions of RedSn0w below.


For Windows:


Redsn0w(Win)0.9.5b5-5  
Redsn0w(Win)0.9.5b5-4
Redsn0w(Win)0.9.5b5-3


For Mac:


Redsn0w(Mac)0.9.5b5-5


23 June 2010

Redsn0w JailBreak for iPhone 4G in Mac

JAILBREAK IPHONE WITH REDSN0W IN MAC


Step One
Create a folder on your desktop called Pwnage

Download RedSn0w from here and place it in the Pwnage folder. Likewise, download the latest 4.0 firmware from below and place it in the same folder.

4.0.0 (3G): iPhone1,2_4.0_8A293_Restore.ipsw

Extract the redsn0w app from the RedSn0w zip file by double clicking it.


Step Two
Connect your iPhone to the computer and launch iTunes. 


Select your iPhone from the list of devices on the left. Now hold down Option and click the Restore button. Restore is preferred as it won't create any wasted space on your iPhone.


Navigate to the Pwnage folder on your desktop and select the firmware ipsw. Click the Choose button to continue. 


Step Three
Once iTunes has finished updating your iPhone to the desired firmware open the Pwnage folder on your desktop and launch the redsn0w application from the redsn0w folder we extracted earlier.


Step Four
Once RedSn0w opens click the Browse button


Step Five
Select the firmware ipsw we placed in the Pwnage folder on our desktop then click Open.


Step Six
Once the firmware has been verified click the Next button to continue.


Step Seven
RedSn0w will now prepare the jailbreak data


Step Eight
From this window you can select the jailbreak options you would like.


Verbose boot displays detailed information on boot of your device and is generally only needed by developers and advanced users.

Make sure Cydia is selected. For this tutorial we will also select Custom boot logo and Custom recovery logo. 

When you click to select each custom logo option a dialog window will appear asking you to select the image. Locate the image you would like to use then press the Open button.


*Remember the rules for boot logos are: RGB or Grayscale format with Alpha channel and dimension below 320x480.

Notice that RedSn0w has already selected to Enable multitasking, Enable homescreen wallpaper, and Enable battery percentage. If you do not need multitasking we would recommend deselecting it as it makes your iPhone 3G run very slow.

Click the Next button to continue


Step Nine
Please plug your iPhone into the computer and make sure its OFF then click the Next button


Step Ten
RedSn0w will now guide you through the steps to get into DFU mode. You can find more help with DFU mode here


Hold down both the Home button and the Power button for 10 seconds.


Release the Power button and continue holding the Home button until RedSn0w detects the device.


Step Eleven
Your iPhone will now reboot


Step Twelve
RedSn0w will then begin uploading the new RAM Disk and Kernel.


Step Thirteen
Once this is complete you will be notified that RedSn0w is done. Click the Finish button. When your iPhone finishes rebooting (5 minutes or so) it will be jailbroken with Cydia on the SpringBoard.


You can now continue to unlock your device using UltraSn0w with my Previous Post.

Redsn0w JailBreak for iPhone 4G in Windows

Step One
Create a folder on your desktop called Pwnage

Download RedSn0w from here and place it in the Pwnage folder. Likewise, download the latest 4.0 firmware from below and place it in the same folder.

4.0.0 (3G): iPhone1,2_4.0_8A293_Restore.ipsw

Extract the redsn0w executable from the RedSn0w zip file into the same folder.


Step Two
Connect your iPhone to the computer and launch iTunes. 


Select your iPhone from the list of devices on the left. Now hold down Option and click the Restore button. Restore is preferred as it won't create any wasted space on your iPhone.


Navigate to the Pwnage folder on your desktop and select the firmware ipsw. Click the Choose button to continue. 


Step Three
Once iTunes has finished updating your iPhone to the desired firmware open the Pwnage folder on your desktop and launch the redsn0w application from the redsn0w folder we extracted earlier.


Step Four
Once RedSn0w opens click the Browse button


Step Five
Select the firmware ipsw we placed in the Pwnage folder on our desktop then click Open.


Step Six
Once the firmware has been verified click the Next button to continue.


Step Seven
RedSn0w will now prepare the jailbreak data

Step Eight
From this window you can select the jailbreak options you would like.


Verbose boot displays detailed information on boot of your device and is generally only needed by developers and advanced users.

Make sure Cydia is selected. For this tutorial we will also select Custom boot logo and Custom recovery logo. 

When you click to select each custom logo option a dialog window will appear asking you to select the image. Locate the image you would like to use then press the Open button.


*Remember the rules for boot logos are: RGB or Grayscale format with Alpha channel and dimension below 320x480. 

Notice that RedSn0w has already selected to Enable multitasking, Enable homescreen wallpaper, and Enable battery percentage. If you do not need multitasking we would recommend deselecting it as it makes your iPhone 3G run very slow.

Click the Next button to continue


Step Nine
Please plug your iPhone into the computer and make sure its OFF then click the Next button


Step Ten
RedSn0w will now guide you through the steps to get into DFU mode. You can find more help with DFU mode here


Hold down both the Home button and the Power button for 10 seconds.


Release the Power button and continue holding the Home button until RedSn0w detects the device.


Step Eleven
Your iPhone will now reboot


Step Twelve
RedSn0w will then begin uploading the new RAM Disk and Kernel.


Step Thirteen
Once this is complete you will be notified that RedSn0w is done. Click the Finish button. When your iPhone finishes rebooting (5 minutes or so) it will be jailbroken with Cydia on the SpringBoard.


You can now unlock your device using UltraSn0w by following instructions on my Next Post.

Twitter Delicious Facebook Digg Stumbleupon Favorites More