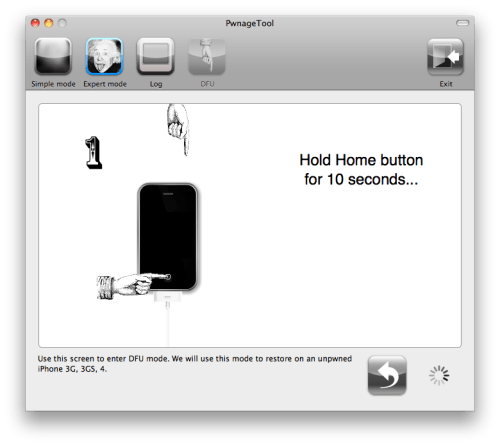
HOW TO PUT IPHONE INTO DFU MODE

First Step to upload custom firmware on iPhone.

IPHONE TETHERING ON VODAFONE INDIA !

Get Vodafone India iPhone Mobile Settings here.

JAILBREAK IPHONE ON IOS7

Steps on how to Jailbreak iPhone on Firmware v7

DOWNGRADE BASEBAND

Downgrade for iPhone 3GS/3G

CONFIGURE GMAIL ON IPHONE

Now its easy to setup gmail account.

Showing posts with label Mac. Show all posts

02 January 2013

How to upgrade a previously jailbroken iPhone to iOS 6 and preserve the baseband.

Steps to upgrade iPhone 3GS/3G to Firmware IOS6.

Step 1: Upgrade your Itunes to latest.
Step 2: Backup your iPhone to Itunes.
Step 3: Download the latest Redsn0w version i.e.  Mac OSX   or  Windows
Step 4: Run your Redsn0w latest version and click on option [ Extras ].
Step 5: Your iPhone should be at firmware version 5.1.1.
Step 6: Select [ Even More ] and then [ Restore ]
Step 7: After that select [ IPSW ] i.e. firmware version 6.0.1 (which needs to be downloaded in advance).
Step 8: Select [ Yes ] to Preserve Baseband update.
Step 9: Now get the device connected to DFU mode.
Step 10: With the iPhone connected and switched off, when you click on next you go through DFU mode.
Step 11: Redsn0w will prepare a  restore image and restore it to the iPhone while preserving the basebands.
Step 12: At last the iPhone gets restore to Firmware version 6.0.1 with baseband version 5.13.00
Step 13: After this you just need to Jailbreak your iPhone and unlock it if required.

Thats it you are all set !


21 January 2012

Jailbreak iPhone 4S and iPad 2 on Firmware 5.0.1

Steps on how to Jailbreak iPhone 4S and iPad 2 on Firmware 5.0.1


1. Download the Application which is only available for Mac till now. Application is named as Absinthe. You can Download this Absinthe from the link mentioned - link
2. The supported devices and firmware for Absinthe are:
iPhone 4S running iOS 5.0, 5.0.1 (9A405 and 9A406)
iPad 2 Wifi/GSM/CDMA running iOS 5.0.1
3. Run the File  Absinthe.app after double tapping it and it will look like...the picture mentioned below.


4. Just Remember to backup all your stuff before Jailbreaking your iPhone.
5. To back up go to Itunes and connect your iPhone and then on the left side where you can see your               iPhone detected in itunes. Right Click on that and click on backup.
6. Now after doing the backup of your iPhone 4S. Place your iPhone 4S into DFU mode. If you dont know how click on the link mentioned here - link


7. After placing your iPhone 4S into DFU mode go to that Application Absinthe and click on the button which has written Jailbreak on it. After that please wait for couple of minutes and then you are done.
8. You will get the Application named Absinthe on you iPhone 4S, now opened that application on your iPhone 4S and then download the Cydia application through it. When done you will get the Cydia on you iPhone 4S.


Do Remember it is just a Jailbreak not a Carrier unlock and please remove the passcode before doing the Jailbreak or else you will get the error message as mentioned in the picture. If you get any issues you can message me down below. i will reply. For now Chao !!!

Troubleshooting --


- Camera roll will be empty if the jailbreak is incomplete. Rerun the app once to fix, and then another time to complete Jailbreak.
- If the Absinthe webclip shows “Error establishing a database connection”, please go to Settings, turn on VPN and wait instead.
- The VPN connection will give an error. This is normal. A reboot should happen a few moments after the error.
- Just reboot and redo the jailbreak if you have problems.
- When jailbreaking: Do not have a passcode set. Do not have your own VPN setup (Absinthe needs to setup its own).
- If Absinthe crashes, reboot your DEVICE and try again.
- Toggle VPN only AFTER Absinthe says it’s done, or it will not work. VPN SHOULD error and then reboot soon. If it does not, rerun Absinthe!


21 February 2011

New WhiteD00r Firmware v4.2 for iPhone 2G, 3G & iPod Touch 1G, 2G.


FEATURES OF NEW WHITED00R FIRMWARE V4.2 FOR IPHONE & IPOD.
1. 
iOS4 User Interface

Whited00r firmwares are based on 3.1.x firmware but it offers a fully modded interface to suite iOS4 one. We are not using Winterboard to achieve this result, so your device will run faster! Unfortunately this firmware can't run iOS4-only applications.
2.
Unlocked

All Whited00r firmwares are jailbroken (with PwnageTool). Latest Cydia is included and fully working. You will find our repo preinstalled. We are also providing unlocked firmwares that include carrier unlock and hacktivation.
3.
Multitasking and Folders

Whited00r firmwares included multitasking and folders. They have been developed by Darlo770. Multitasking is optimized to run on "old" devices with limited ram amount. iPod controls on multitasking dock are working too.
4.
Wallpapers

Whited00r comes with the new iOS4 feature of Home Screen wallpapers. You can easly set it like in iOS4. Moreover, whited00r has the feature of dynamic wallpapers: you can use high resolution images to set Android-like wallpapers.
5.
Native unlocked features

Whited00r unlocks all native features hidden in official Apple firmwares. Battery percentage, Multimedia Messages Service (MMS), tethering via bluetooth and via USB, Tap to Focus in camera, cellular data network fields and Emojii icons are only some examples.
6.
Video Recording

Whited00r includes the best video recording application. It offers the best quality for your videos. Recording quality is better then the one offered by application on AppStore. Moreover video are automatically exported to Photo folder (so you can manage them with iPhoto)
7.
Safari Bookamrks

The Safari browser offers two useful bookmarks: "Search in Page" and a "Flash video converter". The latter enables some kind of flash video in the page you are visiting (like Vimeo or Dailymotion videos). From bookmarks you can also visit the mobile version of whited00r.com and install alphanumeric passcode for your device.
8.
Others Features

You will find other minor features that are not listened here. Whited00r is compatible with iBluenova, A2DP enabler and iBootlace for Andorid installation (dual boot). Visit the forum via "More info" button for power user tweaks.
9.
Whited00r is Free

Whited00r is 100% free and will never use cracked software. Our project is kept alive by donations and sponsors. Please help us! Use "More info" button to donate
GO AND DOWNLOAD ALL FIRMWARES WITH DROP DOWN MENUS HERE - 

28 October 2010

FolderEnhancer supports iOS 4.1 firmware

FolderEnhancer has been updated to now supports iOS 4.1 firmware. FolderEnhancer is a jailbroken tweak which brings some cool improvements to the iOS folders capability.
folderenhancer
iOS 4 brought with it the ability to put apps and bookmarks into folders. Unfortunately, the implementation is quite limited. FolderEnhancer takes this feature and improves upon it, making it a viable solution for organizing and accessing your apps.

FolderEnhancer Features

  • Open folders faster.
  • Add up to 320 icons to a folder (20 pages, 16 per page).
  • Create folders inside of folders.
  • Create folders on the dock.
  • Supports Iconoclasm for custom layouts inside of folders.
  • Extends MultiIconMover to allow moving multiple icons into/out of folders.
  • Options include hiding the folder name and wallpaper, as well as disabling animations.

What’s New In This Version

  • NEW: Added support for iOS 4.1.
  • FIX: With “Close on App Launch” OFF, closing an app launched from a folder while the task switcher was visible would cause the folder to fail to reappear.
  • FIX: With wallpaper off, toggling the task switcher would cause parent folders to become visible, appear stacked.
You can purchase and download FolderEnhancer from the Cydia Store for $1.99. CategoriesSB owners can get the app at $0.99 until the end of October.

Jailbreak Your iPhone 4 Using PwnageTool (Mac) [4.1]

These are instructions on how to jailbreak your iPhone 4 on iOS 4.1 using PwnageTool for Mac.

Step One
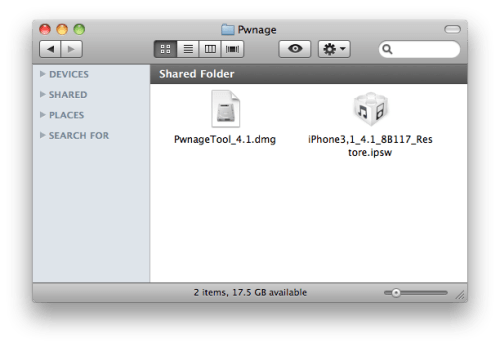
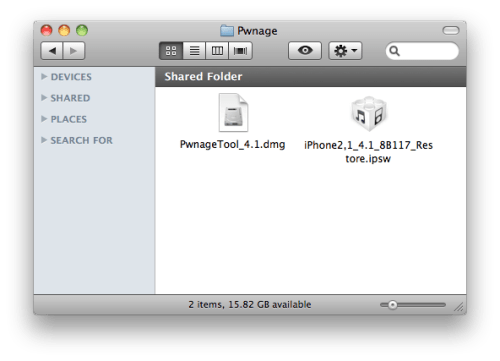
Make a folder called "Pwnage" on the desktop. In it, you will need a couple of things. PwnageTool 4.1, found here

You will also need the 4.1 iPhone firmware. 
4.1.0 (4): iPhone3,1_4.1_8B117_Restore.ipsw

When downloading the IPSW file, it is best to download it with Firefox since Safari often auto extracts it!


Step Two
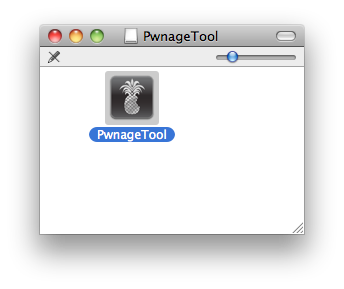
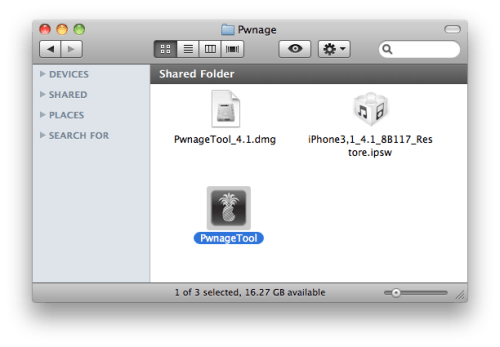
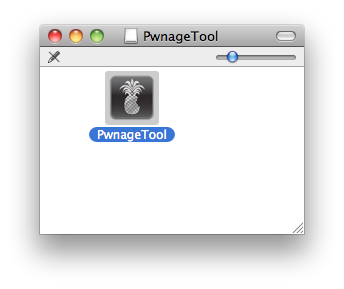
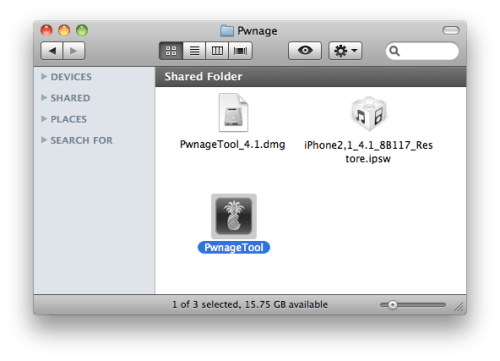
Double click to mount PwnageTool then drag the PwnageTool icon into the Pwnage folder. 


Then from the Pwnage folder double click to launch the PwnageTool application.


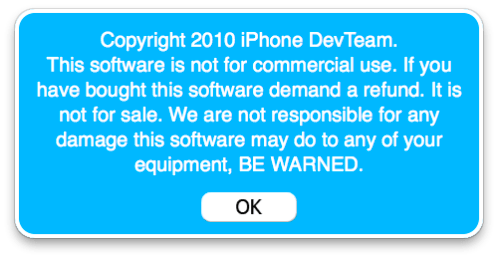
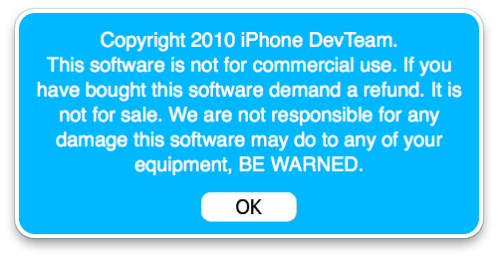
Click Ok if presented with a warning.


Step Three
Click to select Expert Mode from the top menu bar


Step Four
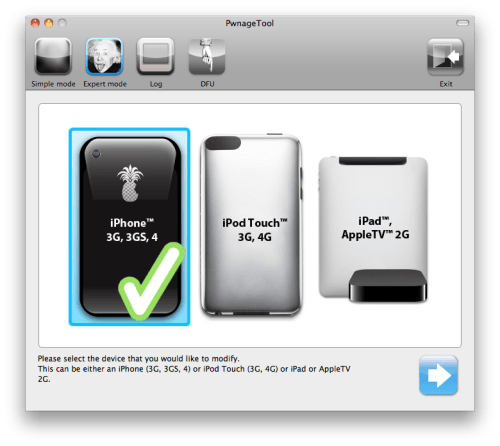
Click to select your device. A check-mark will appear over the image of the device. Click the blue arrow button to continue. 


Step Five
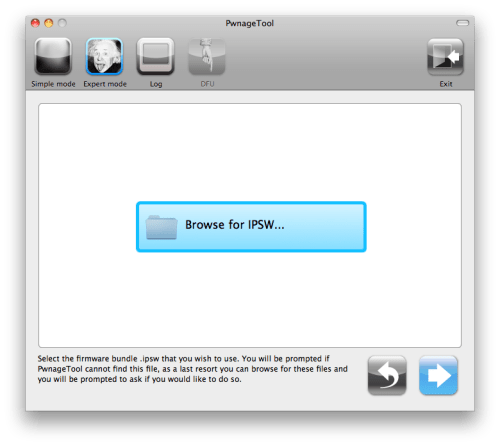
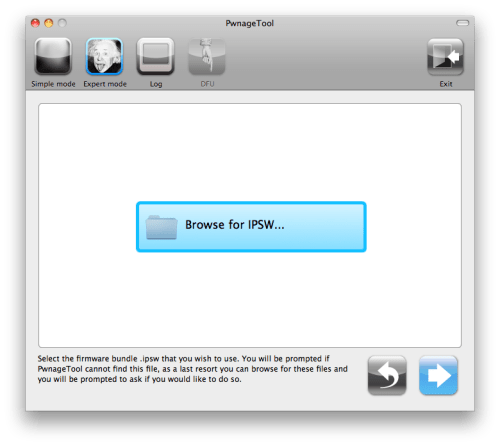
You will be brought to the "Browse for IPSW" page. Click the Browse for IPSW... button.


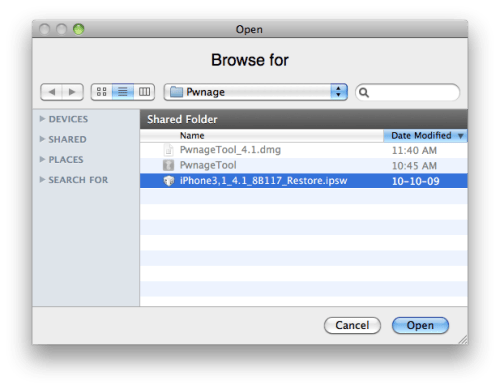
From the popup window select your firmware from the Pwnage folder then click the Open button.


Step Six
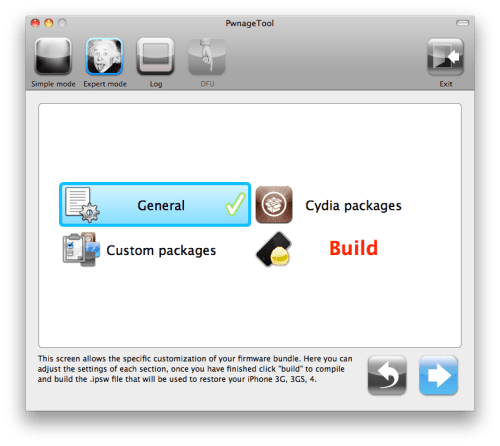
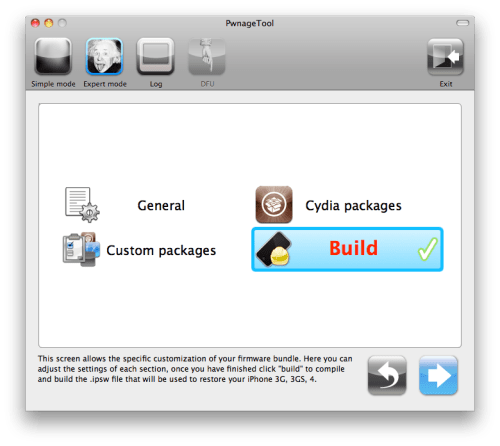
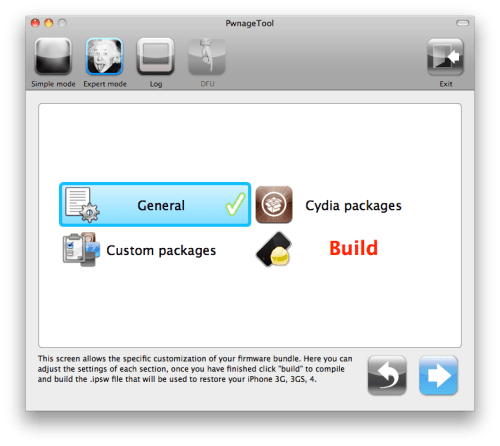
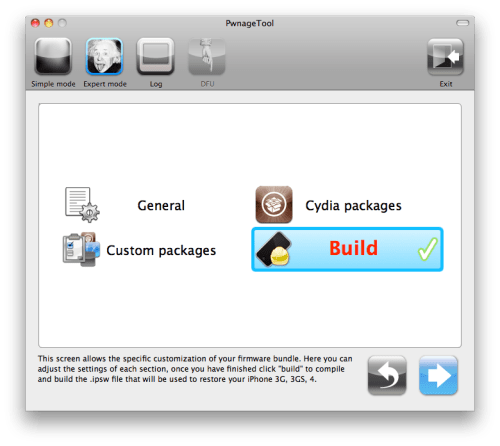
You will then be brought to a menu with several choices. Click to select General then click the blue arrow button.


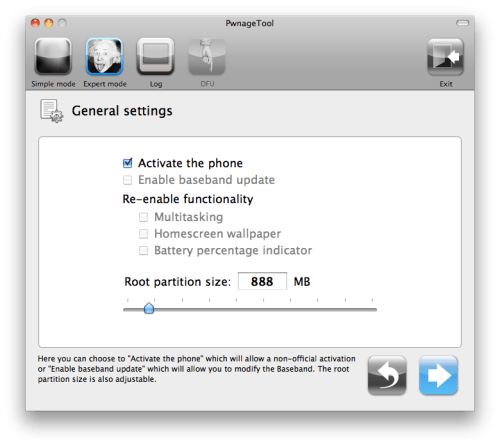
The General settings allows you to decide the partition size. Check Activate the phone if you are not with an official carrier then click the blue arrow button.

NOTE*: Deselect Activate if you have an iPhone legitimately activated on an official carrier.


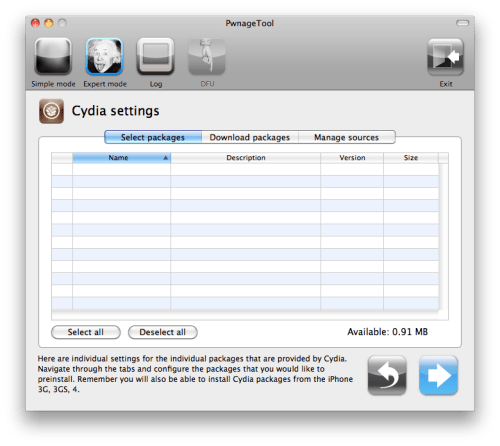
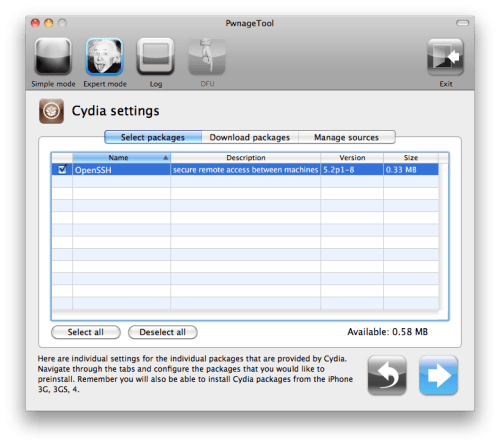
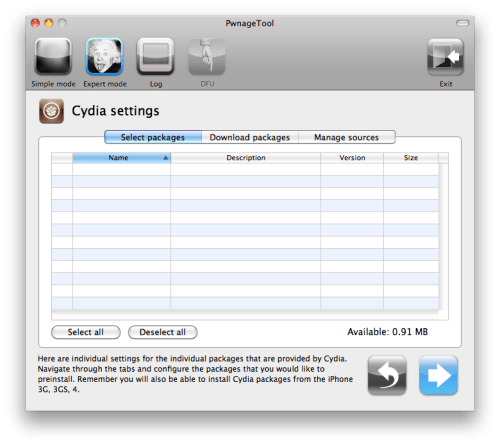
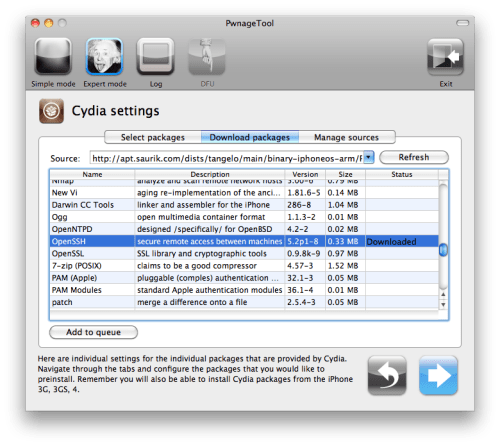
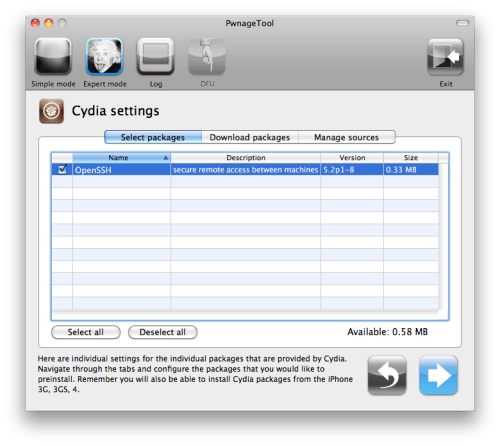
The Cydia settings menu allows you to create custom packages so you do not have to manually install the necessary them later.


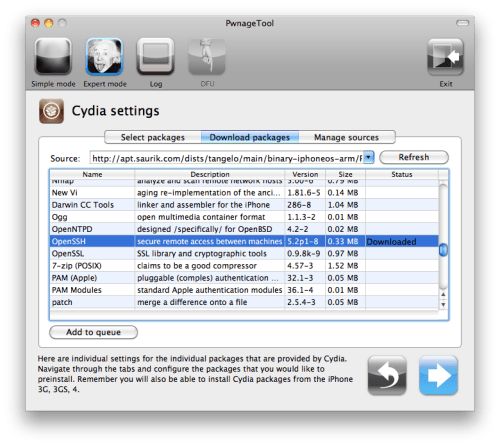
Click to select the Download packages tab. Then click the Refresh button to display all the available packages. Double clicking the package you want will download it and make it available in the Select Packages tab. 


Checkmark the ones you want then click the blue arrow button.


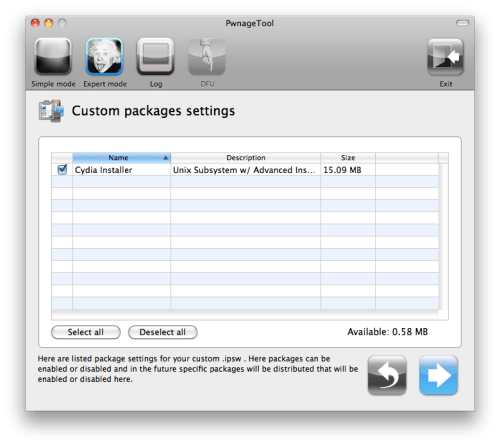
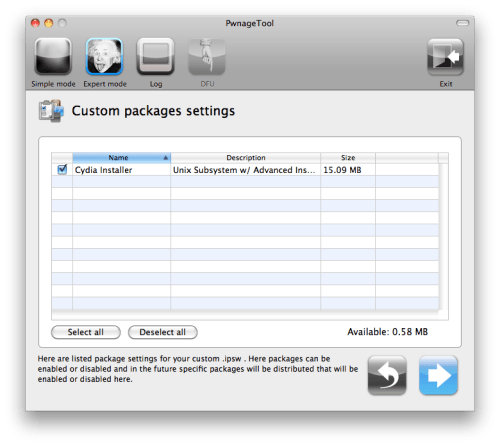
The Custom Packages Settings menu displays listed package settings for your custom IPSW. For know leave these settings as is. Click the blue arrow button to continue.


Step Seven
You are now ready to begin the pwnage process! Click the Build button to select it then click the Blue arrow button to begin.


Step Eight
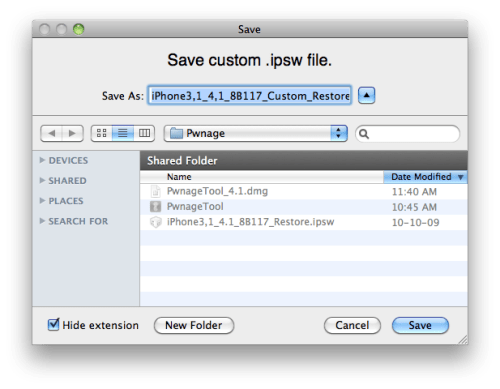
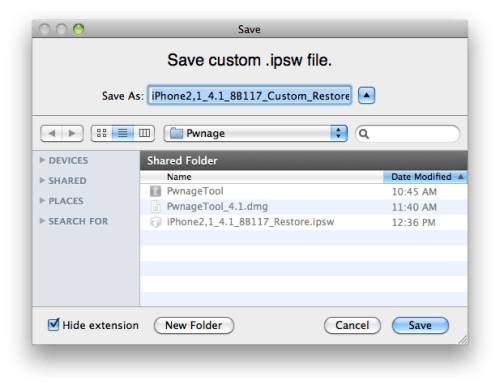
You will be asked to save your custom .ipsw file. Save it to your Pwnage folder you created on your Desktop.


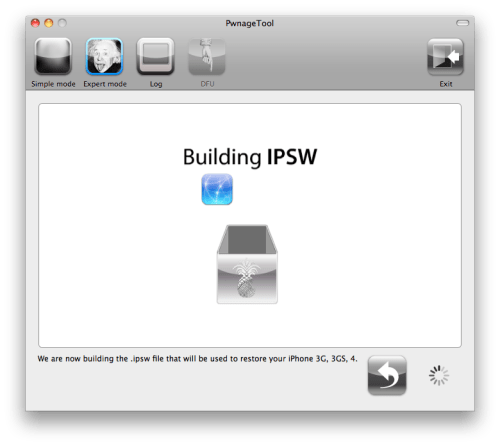
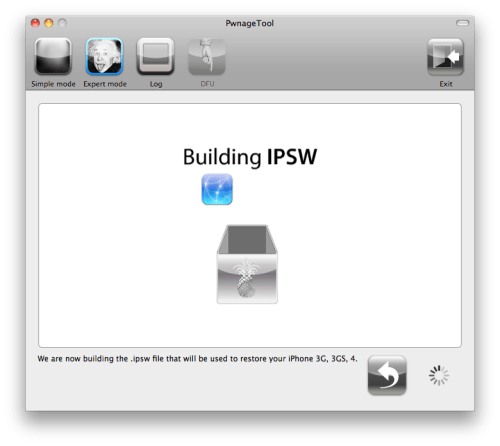
Your IPSW is now being built. Please allow up to 10 minutes.


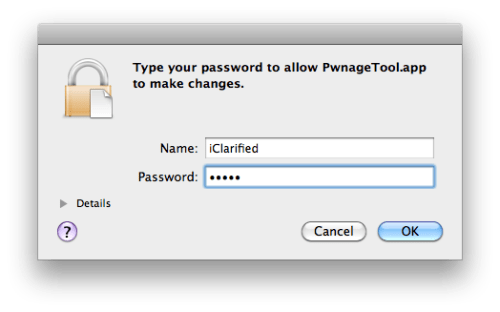
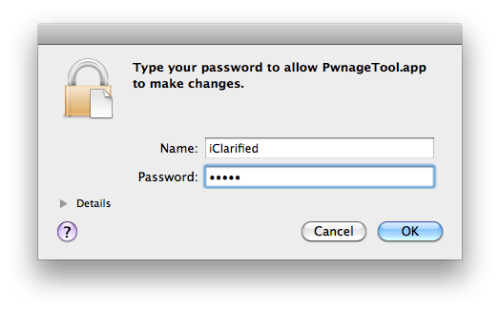
You will be asked to enter your administrator password. Do this then click the OK button.


Step Nine
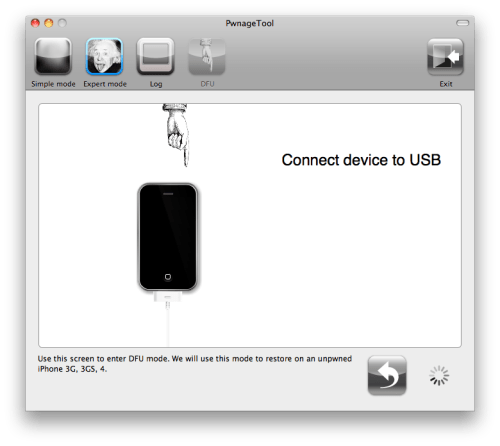
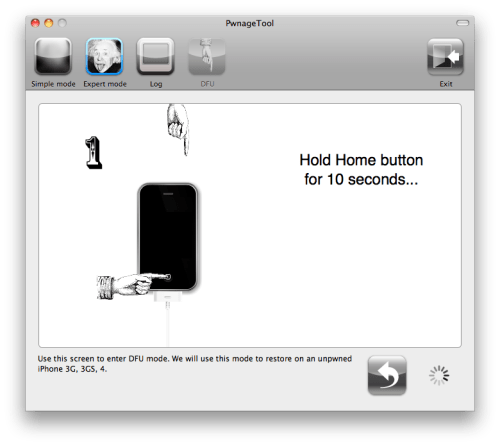
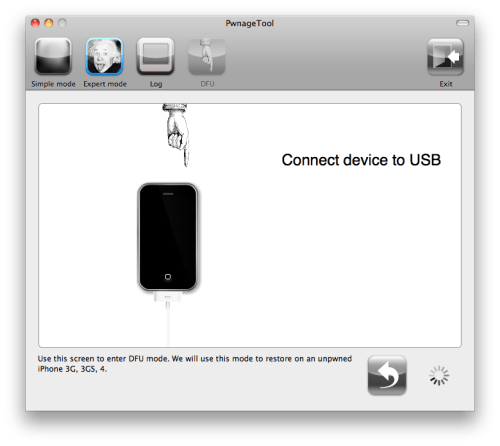
Once your ipsw has been built you will be asked to connect your iPhone to the computer. Once it detects your device PwnageTool will guide your through the steps to putting your iPhone into DFU mode.


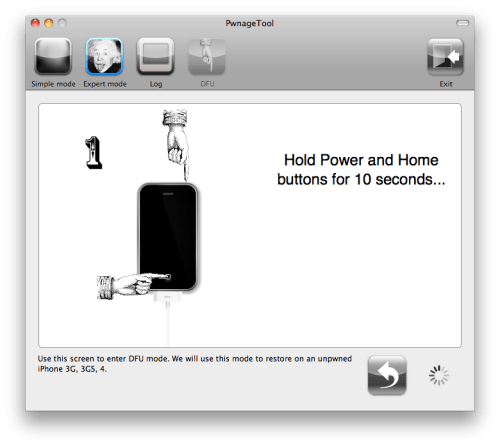
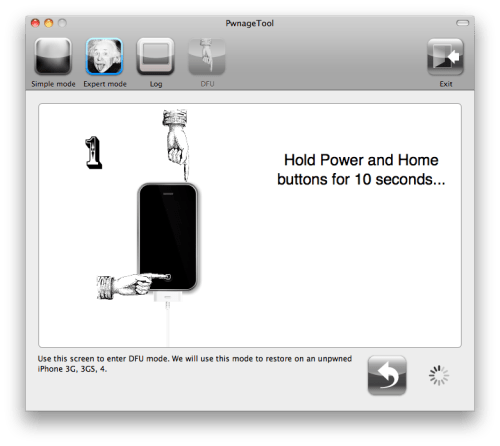
Press and hold the power and home buttons for 10 seconds.


Then release the power button and continue holding the home button for 10 seconds.


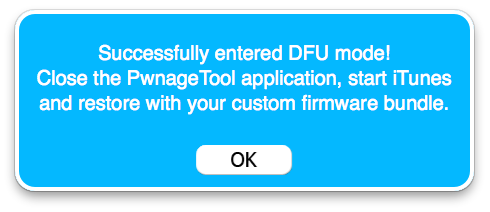
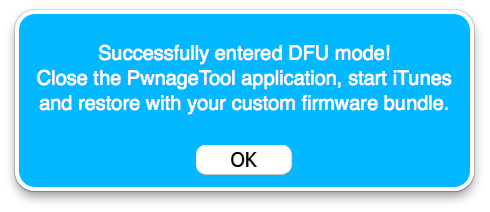
Once your iPhone is successfully in DFU mode, PwnageTool will prompt you to launch iTunes.


Step Ten
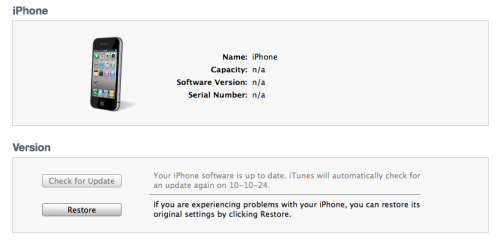
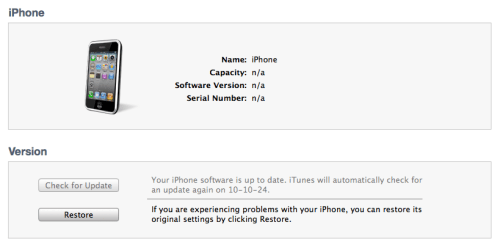
Once In iTunes, hold the Alt/Option key and click Restore.


Step Eleven
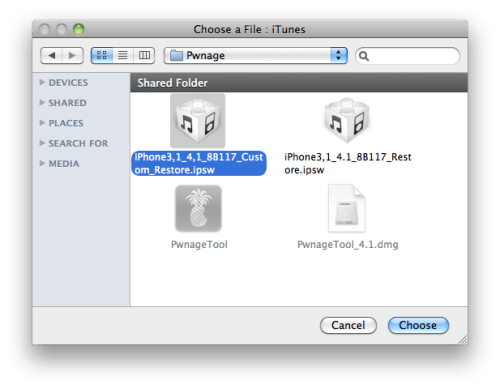
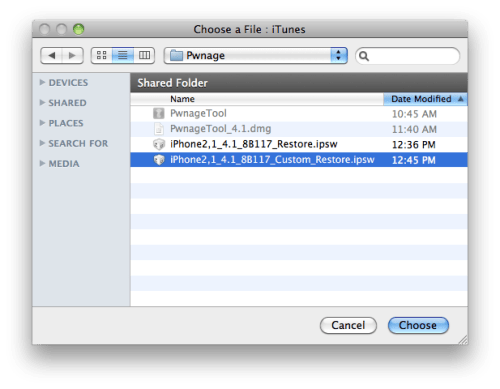
Navigate to the Pwnage folder on your desktop using the dialog window that appears. Select the custom IPSW that was created and click the Choose button.


Step Twelve
iTunes will now restore the firmware on your iPhone. This can also take up to 10 minutes. Once done you will be rebooted into jailbroken iOS 4.1!

Jailbreak Your iPhone 3GS Using PwnageTool (Mac) [4.1]

These are instructions on how to jailbreak your iPhone 3GS on iOS 4.1 using PwnageTool for Mac.

Step One
Make a folder called "Pwnage" on the desktop. In it, you will need a couple of things. PwnageTool 4.1, found here

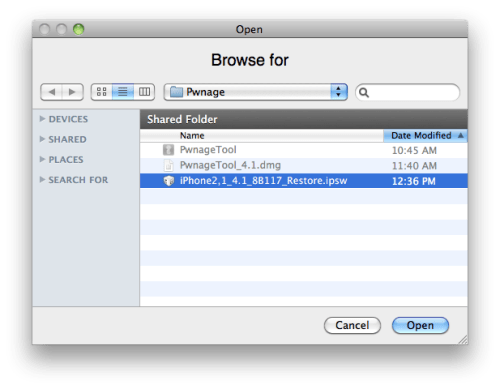
You will also need the 4.1 iPhone firmware. 
4.1.0 (3GS): iPhone2,1_4.1_8B117_Restore.ipsw

When downloading the IPSW file, it is best to download it with Firefox since Safari often auto extracts it!


Step Two
Double click to mount PwnageTool then drag the PwnageTool icon into the Pwnage folder. 


Then from the Pwnage folder double click to launch the PwnageTool application.


Click Ok if presented with a warning.


Step Three
Click to select Expert Mode from the top menu bar


Step Four
Click to select your device. A check-mark will appear over the image of the device. Click the blue arrow button to continue. 


Step Five
You will be brought to the "Browse for IPSW" page. Click the Browse for IPSW... button.


From the popup window select your firmware from the Pwnage folder then click the Open button.


Step Six
You will then be brought to a menu with several choices. Click to select General then click the blue arrow button.


The General settings allows you to decide the partition size. Check Activate the phone if you are not with an official carrier then click the blue arrow button.

NOTE*: Deselect Activate if you have an iPhone legitimately activated on an official carrier.


The Cydia settings menu allows you to create custom packages so you do not have to manually install the necessary them later.


Click to select the Download packages tab. Then click the Refresh button to display all the available packages. Double clicking the package you want will download it and make it available in the Select Packages tab. 


Checkmark the ones you want then click the blue arrow button.


The Custom Packages Settings menu displays listed package settings for your custom IPSW. For know leave these settings as is. Click the blue arrow button to continue.


Step Seven
You are now ready to begin the pwnage process! Click the Build button to select it then click the Blue arrow button to begin.


Step Eight
You will be asked to save your custom .ipsw file. Save it to your Pwnage folder you created on your Desktop.


Your IPSW is now being built. Please allow up to 10 minutes.


You will be asked to enter your administrator password. Do this then click the OK button.


Step Nine
Once your ipsw has been built you will be asked to connect your iPhone to the computer. Once it detects your device PwnageTool will guide your through the steps to putting your iPhone into DFU mode.


Press and hold the power and home buttons for 10 seconds.


Then release the power button and continue holding the home button for 10 seconds.


Once your iPhone is successfully in DFU mode, PwnageTool will prompt you to launch iTunes.


Step Ten
Once In iTunes, hold the Alt/Option key and click Restore.


Step Eleven
Navigate to the Pwnage folder on your desktop using the dialog window that appears. Select the custom IPSW that was created and click the Choose button.


Step Twelve
iTunes will now restore the firmware on your iPhone. This can also take up to 10 minutes. Once done you will be rebooted into jailbroken iOS 4.1!

Twitter Delicious Facebook Digg Stumbleupon Favorites More